Music Bot Tutorial
You can refer to a demo of a Discord BOT for music in Discord4J music-player-demo repository.
This tutorial is not yet migrated to Diataxis framework and might be out of date as it was updated for Discord4J v3.3.x.
Feel free to suggest changes to it in our Discord Server or through a GitHub issue if you encounter issues while following it.
Introduction
One of the most common, and almost necessary, features for any Discord bot is the ability to playback music. This tutorial will provide an in-depth guide on how to create a music bot from scratch using Discord4J (and LavaPlayer).
Discord4J facilitates an environment where a Discord bot can be programmed in two different ways, reactively and/or imperatively. Reactive programming, while more efficient, is a paradigm shift from the traditional imperative Java programming model. This tutorial will provide both reactive and imperative approaches to designing a music bot for users who desire to implement either paradigm.
It is expected to complete this tutorial in under 15 minutes.
| Table of Contents |
|---|
| Introduction |
| Requirements |
| Setting Up IntelliJ |
| Creating a Bot |
| Adding Commands |
| Adding Music |
Requirements
- You should already have your bot created and its token ready for use. If you do not, go to this link, create an application, obtain the bot token, and the Client ID.
- JDK 8 or above should already be downloaded and/or installed on your system.
- This tutorial assumes you are familiar with Java 8 or above concepts with a special emphasis in lambdas. If you are unfamiliar with lambdas, please visit our Lambda Tutorial.
- This tutorial uses IntelliJ IDEA to set up the programming environment and it is assumed to already be installed on your system. Eclipse, Netbeans, and other IDEs have similar, but slightly different, setup processes. Please consult the documentation for your specific IDE as it is necessary.
Setting Up IntelliJ
Before coding, we need to create and setup a project with Discord4J installed. This section will cover what Maven is, how to create a Maven project using IntelliJ, and how to use Maven to install Discord4J.
Step 1
Open IntelliJ and select Create New Project.

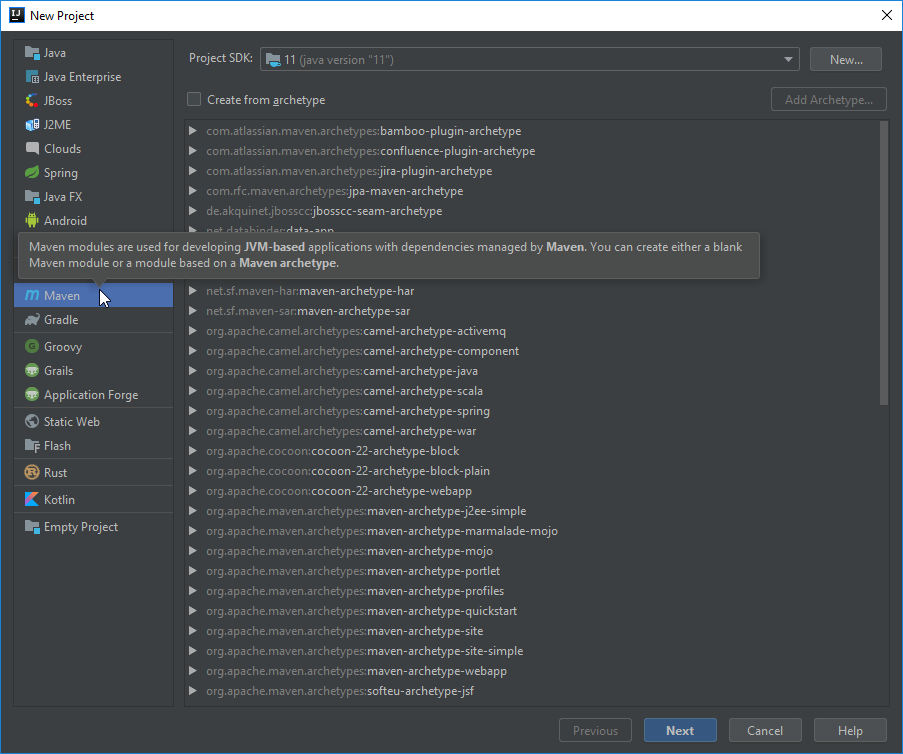
Step 2
Select Maven. Maven is a software project management and comprehension tool. Alongside its main competitor Gradle, Maven is practically required and essential for all Java development projects both personal and professional. It is what will enable us to install Discord4J and its dependencies along with any other dependencies and dependencies of those dependencies easily and with minimal effort.
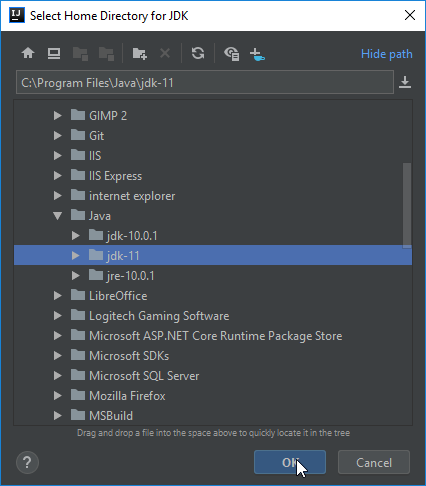
⚠️ If Project SDK is blank, click New and navigate to a directory where a JDK is present and click OK.

Step 3
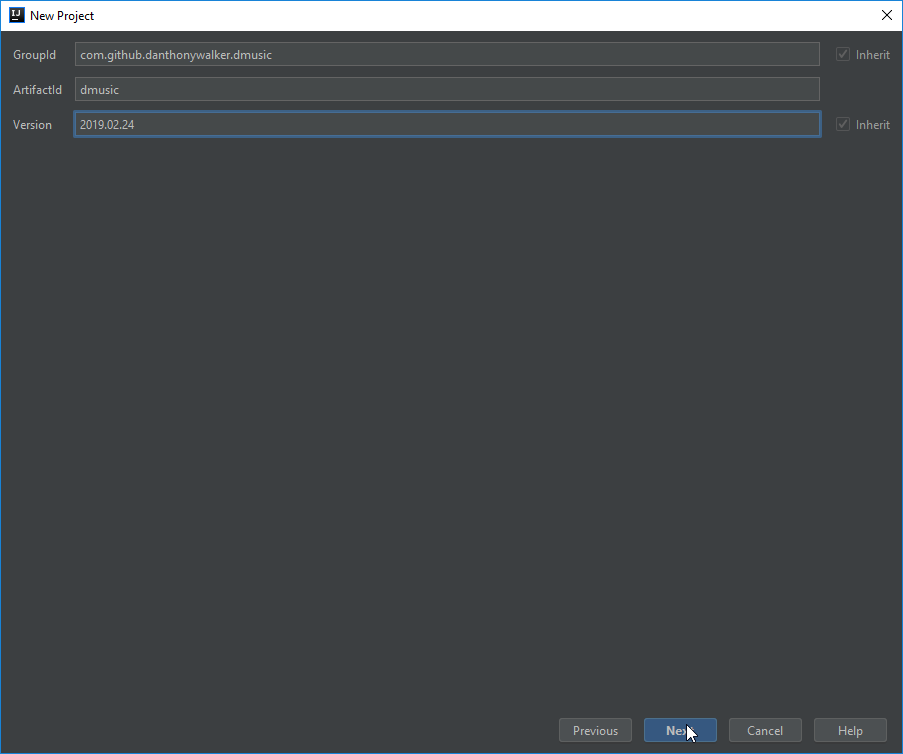
Click Next, and you'll be required to provide a GroupId, ArtifactId, and Version. Refer to this link for a detailed explanation of each of these attributes. After you are done providing your attributes, select Next.
I will be using the reverse domain name of GitHub as my GroupId with an addition of my username and the name of the project (DMusic, for Discord Music). The ArtifactId will be "dmusic" as I expect an outputted jar to be referred to as "dmusic.jar". Finally, as for the Version, since this is an application, not a library, I prefer using a date-based versioning scheme, particularly YEAR.MONTH.DAY.
Step 4
This page will ask for a Project Name. You may leave it as the default (it automatically takes from the ArtifactId), but I personally prefer having proper capitalization when working in IntelliJ. After you have chosen, select Finish.

Step 5
Once IntelliJ has created the project, a dialog box will appear in the bottom-right corner. Select Enable Auto-Import. This will have IntelliJ automatically install dependencies like Discord4J after we request for them, rather than needing to manually refresh the project.

Step 6
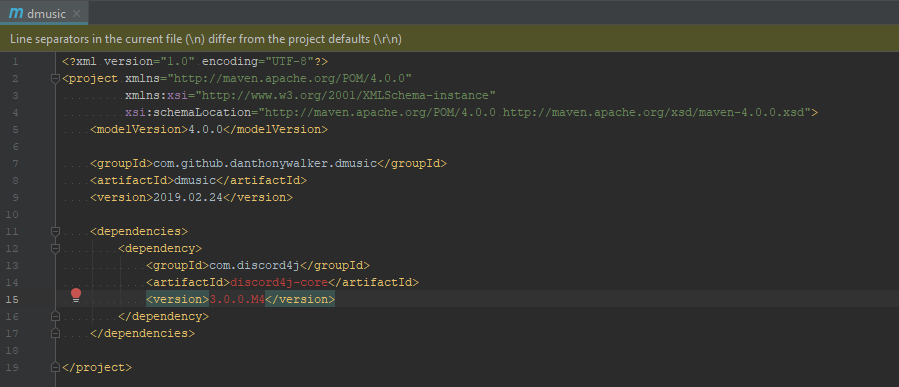
IntelliJ will automatically open the pom.xml after it has created the project. Maven uses the pom.xml to control the project's structure, and it's how we will be telling Maven to install Discord4J. As you can see here, Discord4J provides a set of "coordinates" that tells Maven how to find Discord4J. You may have noticed these coordinates contain a GroupId, ArtifactId, and Version; just like the attributes we have provided earlier! The coordinates are how Maven uniquely identifies a project, picks out a specific version, finds it, and eventually installs it for us.
Add the coordinates to the root of the pom.xml. If the text is red, that is OK! Give IntelliJ and Maven a few seconds or a minute to download and add Discord4J to our project. The text will eventually turn completely white.
Important: Version numbers shown in these images might be outdated. While following this tutorial, prefer using the latest version in the 3.1.x line:

Step 7
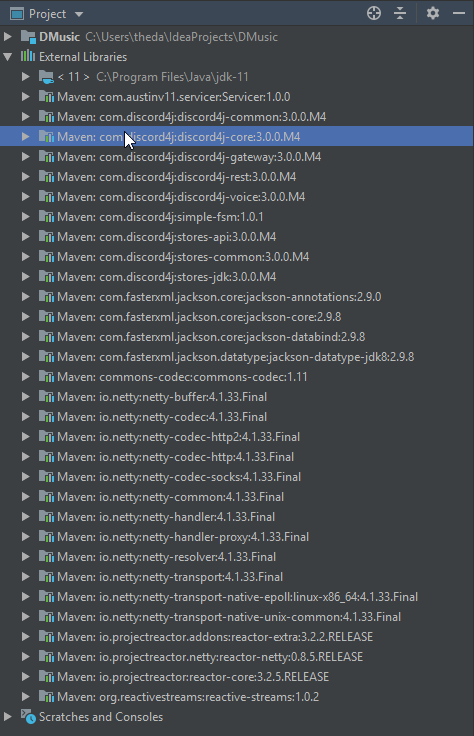
Under External Libraries on the navigation pane, discord4j-core should be present. This means Discord4J has been properly imported, and we are ready to use it in our project!
Creating a Bot
Once IntelliJ is configured for Maven with Discord4J installed we can finally start coding! This section will cover how to make your bot appear online once you start the program.
Step 8
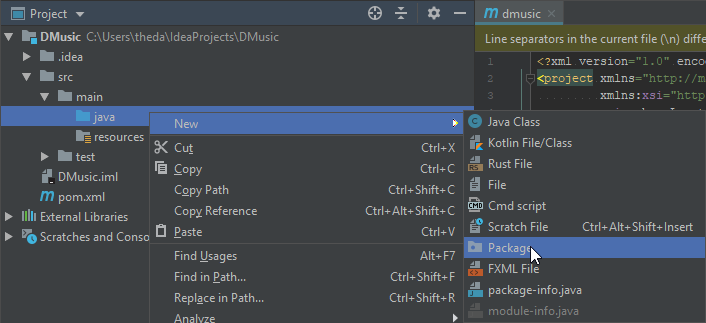
Right click on src/main/java in the Project View and select the New -> Package option. This will allow us to create a base package for us to work with and acts as a starting point to help organize our code.
Step 9
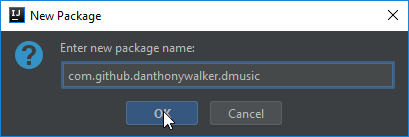
You should choose a package structure equal to the GroupId that you provided back in Step 3.
Step 10
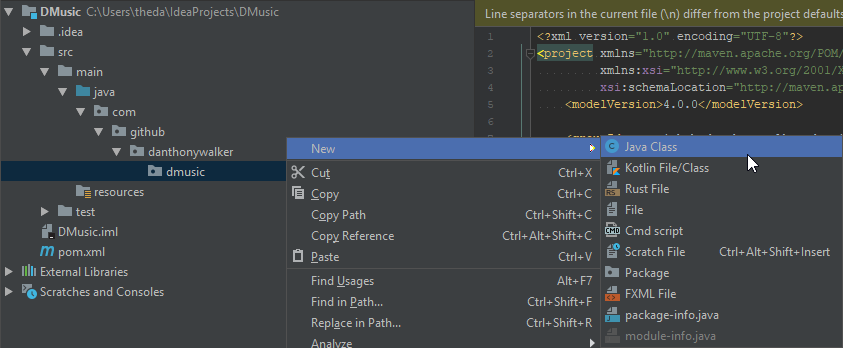
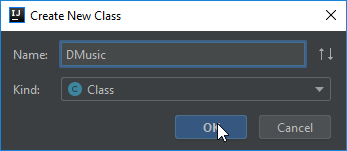
Right click on the last folder of your package structure and select the New -> Java Class option. We will now refer to this specific folder as the root package. For example, dmusic for my project is considered the root package.
Step 11
Choose a class name. It will contain our main method and as a personal preference I like having such classes equal the name of my application.
Step 12
Create a main method and add the code below. Assume args refers to the String array that is standard on all main methods, i.e., String[] args.
Using Discord4J v3.2.x and above
final GatewayDiscordClient client = DiscordClientBuilder.create(args[0]).build()
    .login()
    .block();
client.onDisconnect().block();
Step 13
Click on the green arrow next to the main method and select the Run option.
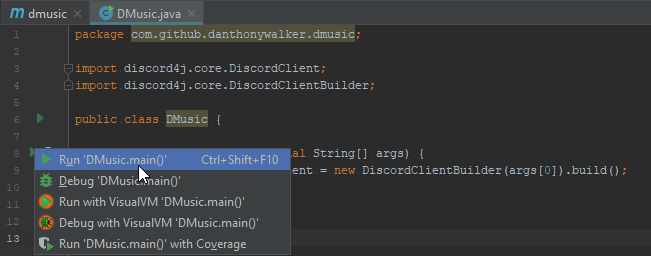
Step 14
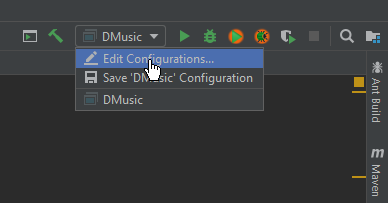
After IntelliJ compiles your program and starts, you'll immediately encounter an ArrayIndexOutOfBoundsException. This is because we haven't provided any arguments for our program yet so args[0] is invalid! So let's fix that. In the top right corner go into the Edit Configurations... menu.
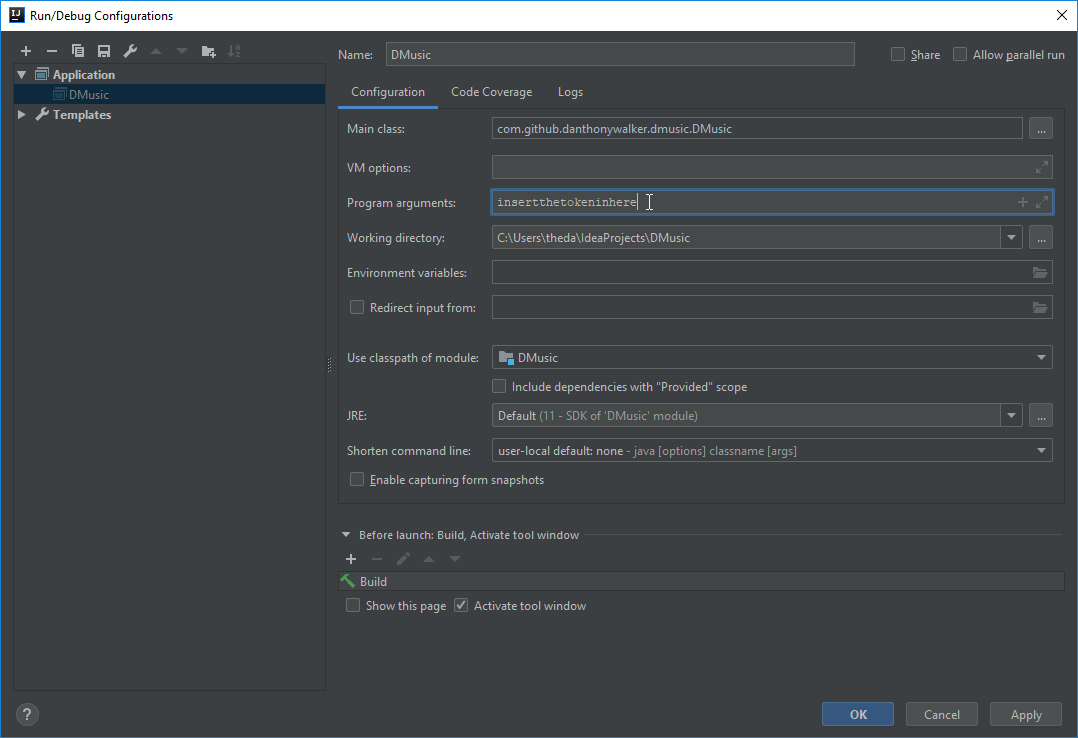
Step 15
Add your bot token to Program arguments and click Apply then OK.
Step 16
Rerun the program, you should now see a bunch of output to the console. Congratulations, your bot is now online! If you invite your bot using the link below, replacing CLIENTID with the Client ID, then you will see your bot green and ready. If you wish to disconnect your bot, click on the Exit button in the console.
https://discord.com/oauth2/authorize?client_id=CLIENTID&scope=bot

Adding Commands
Once the bot appears online, we should allow it to respond to certain input from users. This section will cover one of the many ways to implement commands, or specifically structured user input, to allow responses from our bot.
Code Notice
The next two sections will feature a lot more code than visual guidelines as seen from the previous sections. Each step will go in-depth about what the code does and why the code is written, but it will not step line-by-line to explain every minute detail.
As outlined by the introduction, this tutorial will focus on two paradigms of programming that Discord4J supports, reactively and imperatively. Do NOT implement both paradigms; only implement one. Both paradigms are provided by this tutorial to demonstrate how the two can be translated for easier understanding which is especially important when learning reactive programming.
Step 17
There are many approaches to implementing a command system that have different trade-offs in abstraction, ease-of-use, ease-of-implementation, etc. In this tutorial we will be implementing a map-based, interface-bound command system. It is not the best solution, but you will have a functioning command system up and running very quickly, and it is very simple to understand.
First, create an interface named Command with a single method that accepts a MessageCreateEvent. As the name suggest, this event is fired whenever a message is created. We will be using this interface to represent any given "command", i.e., execute will only fire if we received the particular command that the implementation represents.
Imperative Approach
interface Command {
    void execute(MessageCreateEvent event);
}
Reactive Approach
interface Command {
    // Since we are expecting to do reactive things in this method, like
    // send a message, then this method will also return a reactive type.
    Mono<Void> execute(MessageCreateEvent event);
}
Step 18
Next, we need a way to have all our commands in one place, so we can choose which one we want to fire for any given MessageCreateEvent, if any. The simplest way is to have a Map, where the keys represent the name of the command, with the values being Command instances.
Add the following inside your main class:
private static final Map<String, Command> commands = new HashMap<>();
Step 19
Let's populate this map with a simple "ping pong" command just as a demonstration that the system works. Add the following inside your main class:
Imperative Approach
static {
    commands.put("ping", event -> event.getMessage()
        .getChannel().block()
        .createMessage("Pong!").block());
}
Reactive Approach
static {
    commands.put("ping", event -> event.getMessage().getChannel()
        .flatMap(channel -> channel.createMessage("Pong!"))
        .then());
}
All this code does is add a mapping to "ping" where the bot will create a new message in the same channel with the text "Pong!".
Step 20
Finally, we need a way to hook up our command system to Discord4J's event system. All of Discord4J's events are dispatched through the EventDispatcher that is attached to the DiscordClient instance. EventDispatcher has a single method, on, which determines which type of event the dispatcher should provide us.
After having an event, we need to do some basic filtering to make sure we are executing the right commands for the right messages. To do this, we will simply iterate through all our commands, check if the contents of the message starts with a prefix plus the command we are checking against and, if it does, execute the command.
Discord4J v3.2.x or above: Add the following code after building the GatewayDiscordClient, but before onDisconnect:
Discord4J 3.2.x - Imperative Approach
client.getEventDispatcher().on(MessageCreateEvent.class)
    // subscribe is like block, in that it will *request* for action
    // to be done, but instead of blocking the thread, waiting for it
    // to finish, it will just execute the results asynchronously.
    .subscribe(event -> {
        // 3.1 Message.getContent() is a String
        final String content = event.getMessage().getContent();

        for (final Map.Entry<String, Command> entry : commands.entrySet()) {
            // We will be using ! as our "prefix" to any command in the system.
            if (content.startsWith('!' + entry.getKey())) {
                entry.getValue().execute(event);
                break;
            }
        }
    });
Discord4J 3.2.x - Reactive Approach
client.getEventDispatcher().on(MessageCreateEvent.class)
    // 3.1 Message.getContent() is a String
    .flatMap(event -> Mono.just(event.getMessage().getContent())
        .flatMap(content -> Flux.fromIterable(commands.entrySet())
            // We will be using ! as our "prefix" to any command in the system.
            .filter(entry -> content.startsWith('!' + entry.getKey()))
            .flatMap(entry -> entry.getValue().execute(event))
            .next()))
    .subscribe();
Step 21
Rerun the bot and type "!ping" to any channel the bot can read, and it will promptly respond with "Pong!". Congratulations, you have successfully created your first command and expandable command system. If we need to add a new command, we just simply add another mapping to commands in the static block that we made in step 18.
Adding Music
Once we know how to implement commands, let's add a few more with the added ability to playback music. This section will cover how to make our bot join a voice channel and how to playback audio from a YouTube link.
Step 22
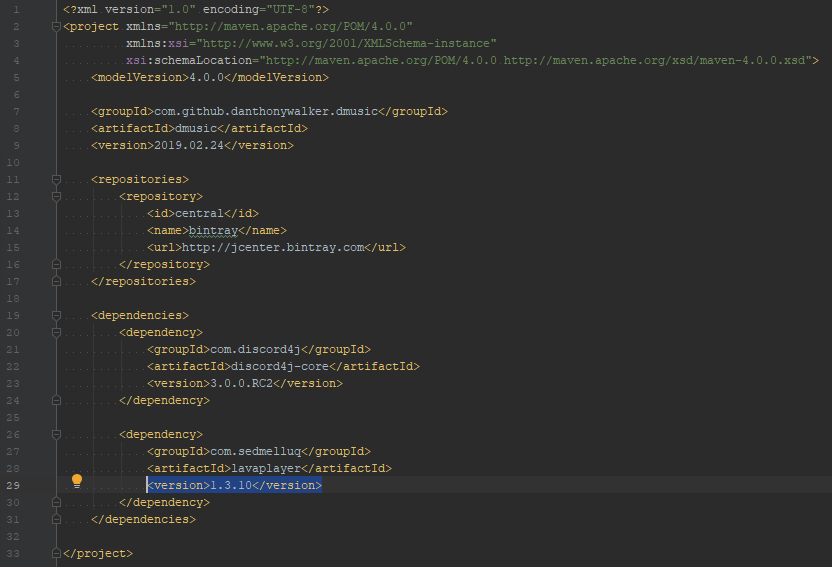
In order to playback audio from a YouTube link we need to be able to extract audio from a YouTube link in a format Discord will recognize. One of the easiest solutions for this is by utilizing LavaPlayer. So in your pom.xml, add the Maven coordinates that LavaPlayer's README specifies.
Important: Version numbers shown in these images might be outdated. While following this tutorial, prefer using the latest version in the 3.1.x line:
For discord4j-core:
For lavaplayer:
Step 23
Add the following code at the start of your main class, before building the DiscordClient.
// Creates AudioPlayer instances and translates URLs to AudioTrack instances
final AudioPlayerManager playerManager = new DefaultAudioPlayerManager();

// This is an optimization strategy that Discord4J can utilize.
// It is not important to understand
playerManager.getConfiguration()
    .setFrameBufferFactory(NonAllocatingAudioFrameBuffer::new);

// Allow playerManager to parse remote sources like YouTube links
AudioSourceManagers.registerRemoteSources(playerManager);

// Create an AudioPlayer so Discord4J can receive audio data
final AudioPlayer player = playerManager.createPlayer();

// We will be creating LavaPlayerAudioProvider in the next step
AudioProvider provider = new LavaPlayerAudioProvider(player);
Step 24
Create the following class:
public final class LavaPlayerAudioProvider extends AudioProvider {

    private final AudioPlayer player;
    private final MutableAudioFrame frame = new MutableAudioFrame();

    public LavaPlayerAudioProvider(final AudioPlayer player) {
        // Allocate a ByteBuffer for Discord4J's AudioProvider to hold audio data
        // for Discord
        super(
            ByteBuffer.allocate(
                StandardAudioDataFormats.DISCORD_OPUS.maximumChunkSize()
            )
        );
        // Set LavaPlayer's MutableAudioFrame to use the same buffer as the one we
        // just allocated
        frame.setBuffer(getBuffer());
        this.player = player;
    }

    @Override
    public boolean provide() {
        // AudioPlayer writes audio data to its AudioFrame
        final boolean didProvide = player.provide(frame);
        // If audio was provided, flip from write-mode to read-mode
        if (didProvide) {
            getBuffer().flip();
        }
        return didProvide;
    }
}
Step 25
Once Discord4J and LavaPlayer are linked together, we need to have our bot be able to join voice channels to playback music. As a very simple demonstration, we will be adding a "join" command where the bot will join the voice channel of the user who made the request.
Add the following code after creating the AudioProvider instance from step 23.
Imperative Approach
commands.put("join", event -> {
    final Member member = event.getMember().orElse(null);
    if (member != null) {
        final VoiceState voiceState = member.getVoiceState().block();
        if (voiceState != null) {
            final VoiceChannel channel = voiceState.getChannel().block();
            if (channel != null) {
                // join returns a VoiceConnection which would be required if we were
                // adding disconnection features, but for now we are just ignoring it.
                channel.join(spec -> spec.setProvider(provider)).block();
            }
        }
    }
});
Reactive Approach
commands.put("join", event -> Mono.justOrEmpty(event.getMember())
    .flatMap(Member::getVoiceState)
    .flatMap(VoiceState::getChannel)
    // join returns a VoiceConnection which would be required if we were
    // adding disconnection features, but for now we are just ignoring it.
    .flatMap(channel -> channel.join(spec -> spec.setProvider(provider)))
    .then());
Step 26
Finally, let's add a command that takes a YouTube link, extracts audio from it, and plays it back to the channel. First, we need to make a class taking processed AudioTrack instances and loads them into an AudioPlayer. The class this tutorial will make is the most basic implementation, but it is possible to design a "queue" system rather than an overriding system with a bit more requisite knowledge outside the scope of this tutorial.
Create the following class:
public final class TrackScheduler implements AudioLoadResultHandler {

    private final AudioPlayer player;

    public TrackScheduler(final AudioPlayer player) {
        this.player = player;
    }

    @Override
    public void trackLoaded(final AudioTrack track) {
        // LavaPlayer found an audio source for us to play
        player.playTrack(track);
    }

    @Override
    public void playlistLoaded(final AudioPlaylist playlist) {
        // LavaPlayer found multiple AudioTracks from some playlist
    }

    @Override
    public void noMatches() {
        // LavaPlayer did not find any audio to extract
    }

    @Override
    public void loadFailed(final FriendlyException exception) {
        // LavaPlayer could not parse an audio source for some reason
    }
}
Step 27
Now, let's add the command. We are going to add a "play" command, but with an additional technique to extract arguments from it. We will not be doing any sort of validation (i.e., check if the argument exists or if there are more than 1 arguments), but it would likely be a good idea to do so at a later date.
Add the following code right after your "join" command.
Imperative Approach
final TrackScheduler scheduler = new TrackScheduler(player);
commands.put("play", event -> {
    final String content = event.getMessage().getContent().get();
    final List<String> command = Arrays.asList(content.split(" "));
    playerManager.loadItem(command.get(1), scheduler);
});
Reactive Approach
final TrackScheduler scheduler = new TrackScheduler(player);
commands.put("play", event -> Mono.justOrEmpty(event.getMessage().getContent())
    .map(content -> Arrays.asList(content.split(" ")))
    .doOnNext(command -> playerManager.loadItem(command.get(1), scheduler))
    .then());
Step 28
Rerun your bot and join a voice channel that the bot can also join. Type !join and then type !play https://www.youtube.com/watch?v=dQw4w9WgXcQ. Congratulations! You now have a bot that can parse commands, have an expandable command system, can join voice channels, and playback audio from YouTube (and other sources LavaPlayer supports).
That is the conclusion of this tutorial! If you have any questions or issues, you may ask in the Discord4J Discord server. Feedback is also welcomed, and thank you for your interest in learning Discord4J.